Hello Hexo!
问题
Markdown中不能使用变量
Ruby-Jekyll环境下,是可以直接在markdown中插入yaml中定义的变量的,所以就可以把OSS(COS)存储的图片链接放到yaml里,方便管理。从Jekyll转到Hexo发现在markdown中使用变量是行不通的,但是知道了半点解决办法——注册插件:GitHub和知乎的解决方案。在此方案下我做了一些不完全的测试: 1. 在source/_data目录下新建文件夹并有序存放yaml文件,在hexo generate过程中是找不到yaml文件的。 2. 把yaml放在根目录下,能找到文件,但是找不到变量的键,1中也会有此种情况。 3. 直接把数据放在站点配置文件中,可用找到变量并引用其值,但是只能硬编码,不能动态地找到变量,因为js中的变量类型是字符串
hexo.extend.tag.register('variable', function(args) { |
关于代码块附加说明的样式
在代码高亮主题night bright 下,使用{% codeblock %} {% endcodeblock %}添加说明后,页面显示字体颜色和背景相近,不容易分辨,可以更改css样式来解决这一问题:

if $highlight_theme == "night bright" |
插入图片
图片并排
更新到hexo-cli v4.2.0 已修复
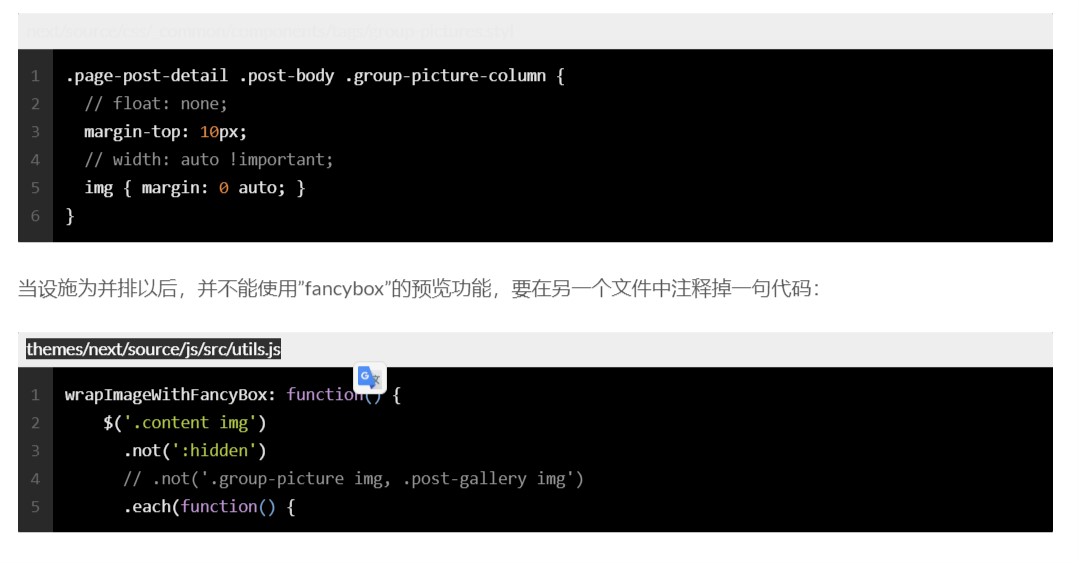
Hexo默认情况下是不能让图片并排显示的,这里需要更改一下设置,将下方代码块的两行注释掉即可。 Markdown中的语法{% gp 1-n %} {% endgp %},n代表需要并排的图片个数。
之前不可在行内使用单反引号引用标签插件,否则会被hexo理解为插入标签。
.page-post-detail .post-body .group-picture-column { |
当图片设置为并排显示以后,不能使用"fancybox"的预览功能,要在另一个文件中注释掉一句代码:
wrapImageWithFancyBox: function() { |
插入本地资源文件夹中的图片
将_config.yml中的post_asset_folder设置为true之后,并不能顺利地以的方式添加图片。 需要安装"hexo-asset-image"的依赖,再将第24行代码var endPos = link.lastIndexOf('.'); 修改为var endPos = link.lastIndexOf('/');后才能正常使用。
字体
更新至hexo-next v7.8.0,文章字号大了一圈,涂涂改改两天才得到差不多的效果。 以下文件分别修改了文章正文、标题、代码的字号。
+desktop-large() { |
.posts-expand .post-title { |
pre { |
功能与插件
一言
来自这里:ouuan
在代码所示文件中找到这一字段:
<aside id="sidebar" class="sidebar">,然后在下边粘贴。themes/next/layout/_macro/sidebar.swig <!--
<aside id="sidebar" class="sidebar">
-->
<!-- 一言 start -->
<div class="sidebar-inner">
<div>
<div style="display: table-cell;vertical-align: top; color:#B2B7F2;font-size:24px;font-family:'Times New Roman',serif;font-weight:bold;text-align:left;">“</div>
<div style="display: table-cell;text-align: left; vertical-align: middle; text-indent: 2em; padding: 0.8em 0.2em 1em 0.2em"><b><span style="color:burlywood;"><span id="hitokoto-content"></span></span></b></div>
<div style="display: table-cell; vertical-align: bottom; color:#B2B7F2;font-size:24px;font-family:'Times New Roman',serif;font-weight:bold;text-align:left;">”</div>
</div>
<div style="text-align: right; font-size: 0.8em; color: black;" id="hitokoto-from"></div>
<div style="margin-top: 15px; font-size: 0.8em; color: black;"><a href="https://hitokoto.cn/">Hitokoto</a></div>
</div>
<div style="height: 15px"></div>
<!-- 一言 end -->themes/next/layout/_scripts/commons.swig <script type="text/javascript">
$.get('https://v1.hitokoto.cn/?c=a', function (data) {
$('#hitokoto-content').css('display', '').text(data.hitokoto);
$('#hitokoto-from').css('display', '').text('——' + data.from);
});
</script>themes/next/source/css/_custom/custom.styl .sidebar {
background: rgba(0, 0, 0, 0);
}
折叠块功能
详细内容请见该链接
{% fold 所涉及到的文件: %} |
网页背景
在这里学到的背景图设置,看到其博客效果后向朋友学习了如何去掉文章背景。
设置网页背景及文章透明度
body { |
文章背景
去除背景只需要把该元素的background属性注释掉即可。
使用深色背景会造成博客阅读困难
- 文章及文章预览
.content-wrap { |
- 阅读全文按钮
.btn { |
jemoji
给Hexo添加对表情的支持,使用的是Github Emojis API
安装
$ npm install hexo-filter-github-emojis --save
选项
在Hexo配置文件_config.yml中添加默认设置:
githubEmojis: |
如果对::添加表情的方式不感冒,可以尝试使用{% github_emoji sparkles %}方式添加表情🎉
在front-matter中添加no-emoji: true可以禁用::的渲染,但{% github_emoji sparkles %}不会被禁用✨
bootstrap note
使用方式 {% note class_name %} Content (md partial supported) {% endnote %}
default
primary
success
info
warning
danger
bootstrap note2
里边加了分割线-------的话,匿名分割线上方的一行会变成同级标题
Gist
{% gist gist_id file_name %}
<% gist 19169c91a19ab7580e4678e4ed25375f extensions.json %>
{% fold 点击查看gist %} |
swig标签
{% raw %} content {% endraw %}接下来
浮动插入图片,像这个
无法访问404
只能以localhost:4000/404.html的方式访问
本页侧边栏
滑到最上方,然后向右看👉