\(\LaTex\) 论文写作笔记
Latex样式
页面尺寸
\usepackage {geometry}\geometry {a4paper, left=2.4cm, top=2.4cm, right=2.4cm, bottom=2.4cm}
页眉页脚
L、C、R分别表示左、中、右;E、O表示奇偶页,页眉页脚的设置中可以使用它们的组合,多选项的情况用中括号分开。 现在有几个问题: 1. 页眉需要的样式是:奇数页居中显示章节号,偶数页显示“东北林业大学本科毕业论文”,但是通过[CE]、[CO]设置就不行,而且只设置\fancyhead[CE]{\song\xiaowu{东北林业大学本科毕业论文}}也会失败,什么都不显示。 2. 双线页眉的长度一开始是\headwidth,右侧没有达到文档宽度的位置。改为\columnwidth或\textwidth之后,长度虽然改变了,但是文字的位置没有随之向右移动(没有居中) 3. 问题1中的章节号不知道怎么获取……
\usepackage {fancyhdr}\pagestyle {fancy}\fancyhf {} \fancyhead [C]{\song \xiaowu {东北林业大学本科毕业论文}}\fancyfoot [C]{\xiaowu {-\thepage -}}\renewcommand {\headrulewidth }{0.4pt}\makeatletter \def \headrule {{\if@fancyplain \let \headrulewidth \plainheadrulewidth \fi \hrule \@height 1.0pt \@width \columnwidth \vskip 1pt\hrule \@height 0.5pt\@width \columnwidth \vskip -2\headrulewidth \vskip -1pt} \vspace {6mm}} \makeatother
Latex功能
图片标题的样式
把图片标题默认的“图1:示例”更改为“图2-1 示例”。 其中: - thesection{} 表示章节号 - 两个命令分别设置表格和插图的格式 - 命令中的“-”可以用“.”等符号代替,以适应不同的要求
\renewcommand {\thetable } {\thesection {}-\arabic {table}} \renewcommand {\thefigure } {\thesection {}-\arabic {figure}}\captionsetup {labelformat=default,labelsep=space}
## 公式编号样式
\renewcommand \theequation {\arabic {section}-\arabic {equation}} \begin {equation} (\ref {Formula.Second.1}) \Leftrightarrow S(i,j)=(K*I)(i,j)=\sum _ m \sum _ n I(i-m,j-n)K(m,n)\label {Formula.Second.3} \end {equation}(\ref {Formula.Second.3})式也被称为I和K的互相关
并排图片
\begin {figure}[htbp] \centering \subfigure [原图]{ \includegraphics [width=0.2\textwidth ]{resource/2-原图.jpg} } \subfigure [互相关]{ \includegraphics [width=0.2\textwidth ]{resource/2-互相关.jpg} } \subfigure [卷积]{ \includegraphics [width=0.2\textwidth ]{resource/2-卷积.jpg} } \caption {卷积核的翻转对特征提取的影响} \label {Figure.Second.1} \end {figure}
并排图片组
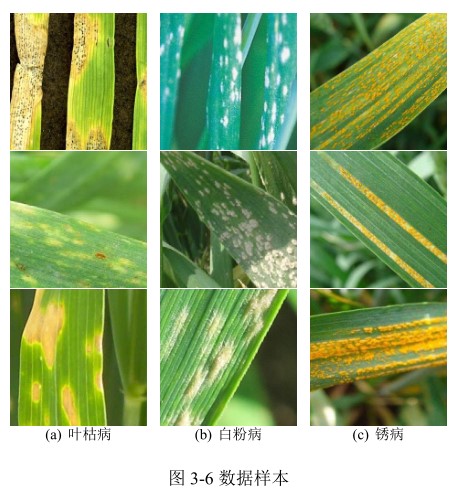
\begin {figure}[H] \centering \subfigure [叶枯病]{ \begin {minipage}[t]{.2\textwidth } \includegraphics [width=\textwidth ]{resource/third/blight(1).jpg} \ \includegraphics [width=\textwidth ]{resource/third/blight(2).jpg} \ \includegraphics [width=\textwidth ]{resource/third/blight(3).jpg} \end {minipage} } \subfigure [白粉病]{ \begin {minipage}[t]{.2\textwidth } \includegraphics [width=\textwidth ]{resource/third/powdery(1).jpg} \ \includegraphics [width=\textwidth ]{resource/third/powdery(2).jpg} \ \includegraphics [width=\textwidth ]{resource/third/powdery(3).jpg} \end {minipage} } \subfigure [锈病]{ \begin {minipage}[t]{.2\textwidth } \includegraphics [width=\textwidth ]{resource/third/rust(1).jpg} \ \includegraphics [width=\textwidth ]{resource/third/rust(2).jpg} \ \includegraphics [width=\textwidth ]{resource/third/rust(3).jpg} \end {minipage} } \caption {数据样本} \label {Figure.Third.6} \end {figure}
插入代码块
\usepackage {listings} \lstset { basicstyle=\xiaowu \fontspec {Consolas}, columns=fixed, frame=none, backgroundcolor=\color [RGB]{245,245,244}, keywordstyle={ \color [RGB]{40,40,255} \fontspec {Consolas} }, numberstyle=\footnotesize \color {darkgray}, commentstyle=\it \color [RGB]{0,96,96}, stringstyle=\rmfamily \slshape \color [RGB]{128,0,0}, showstringspaces=false, language=python, }
参考文献(bibtex)
将bibtex格式的文本保存在论文同目录的references.bib 文件中,并在论文合适的地方插入该语句:
\bibliographystyle {unsrt} \bibliography {references}
references.bib @article{hubel1962receptive, title={Receptive fields, binocular interaction and functional architecture in the cat's visual cortex}, author={Hubel, David H and Wiesel, Torsten N}, journal={The Journal of physiology}, volume={160}, number={1}, pages={106--154}, year={1962}, publisher={Wiley Online Library} }
在论文中插入
\cite{hubel1962receptive}以引用参考文献
LaTeX 参考文献标准选项及其样式共有以下8种: 1. plain,按字母的顺序排列,比较次序为作者、年度和标题 2. unsrt,样式同plain,只是按照引用的先后排序 3. alpha,用作者名首字母+年份后两位作标号,以字母顺序排序 4. abbrv,类似plain,将月份全拼改为缩写,更显紧凑 5. ieeetr,国际电气电子工程师协会期刊样式 6. acm,美国计算机学会期刊样式 7. siam,美国工业和应用数学学会期刊样式 8. apalike,美国心理学学会期刊样式
参考文献编号上标
将\cite命令替换为\upcite命令。
\newcommand {\upcite }[1]{\textsuperscript {\textsuperscript {\cite {#1 }}}}
## 插入pdf
\usepackage {pdfpages}\begin {document}\includepdf [⟨key=val⟩]{⟨filename⟩}\end {document}
+
默认插入第一页 +
插入第1、2页 +
插入第3、4、5页 +
依次插入第3页、空白页、第8、9、10、11、15页 +
全部插入 + 更多参数详见pdfpages文档:
texdoc pdfpages
插入自定义宽度字符
为了应付查重而想出的奇技淫巧,经测试没什么B用 +
零宽空格 + **
** 插入白色的“.”,并减小其宽度使其看起来并没有插入任何字符 下图对比可看出“.”的存在
Latex问题
引入图片时报图片文件找不到的错误
这个问题在写作前期没有出现,后来不知道做了什么改动才报这个错误的。 把图片的文件名改成英文解决了。
图表编号清零
没有专门设置的情况下,新的一章中插图的编号不会清零,在开头插入以下代码即可:
\setcounter {table}{0}\setcounter {figure}{0}
## 中文加粗失败 你可能需要这个:
AutoFakeBold ,在
\documentclass[12pt, UTF8, AutoFakeBold]{ctexart}中加入。 解决方案来自这里:
xelatex编译加粗楷体为什么会失败?
插入图片位置
latex为了排版的美观,可能图片的位置和源码中的位置不相对应,如果要强制插图在某一位置,需要\usepackage{float}, 在图片中加入[H]选项替代[htbp]以强制图片在该位置。
图片尺寸
有的情况下不指出图片的尺寸,直接插入图片会报错,在选项中使用natwidth 和natheight 可以解决问题。 \includegraphics[width=\textwidth, natwidth=1612, natheight=482]{resource/second/LeNet-5.png}